

Network scanning is a fundamental process in cybersecurity, allowing security professionals to identify open ports, services, and potential vulnerabilities within a network. It is an essential step in both defensive and offensive security operations, enabling organizations to assess their attack surface and identify potential weaknesses before malicious actors can exploit them. Among the most widely used tools for this purpose is NMAP, a robust and versatile network scanner that has been an industry standard for years due to its ability to perform comprehensive scans and service identification.
However, in certain scenarios, there is a need for more lightweight or customizable solutions that allow for targeted scanning with minimal overhead. This is where scripting languages like Python, Bash, and PowerShell come into play. Each of these languages provides powerful capabilities for network scanning, enabling security professionals to write custom scripts tailored to specific tasks. Whether it’s a quick scan of open ports, checking the availability of a service, or conducting specific network assessments, these scripting alternatives offer flexibility and control that pre-built tools like NMAP may not always provide.
In this article, we will explore how Python, Bash, and PowerShell can be used to perform IP and port scanning, presenting each with practical examples that showcase their strengths and capabilities. By the end, you’ll have a deeper understanding of how these tools can complement or even replace traditional scanning solutions in specific use cases.
1. Python for IP and Port Scanning
Python is a versatile language that excels in a wide range of cybersecurity tasks, including port scanning. One of Python’s greatest strengths is its extensive standard library, which provides built-in modules like socket for network communication, and threading or concurrent.futures for multi-threading. This allows for efficient, scalable scripts that can perform tasks like port scanning across multiple targets simultaneously. The flexibility of Python enables security professionals to create custom scripts tailored to specific needs, from simple scans to more complex network assessments, making it a powerful alternative to traditional scanning tools like NMAP.
Code Example:
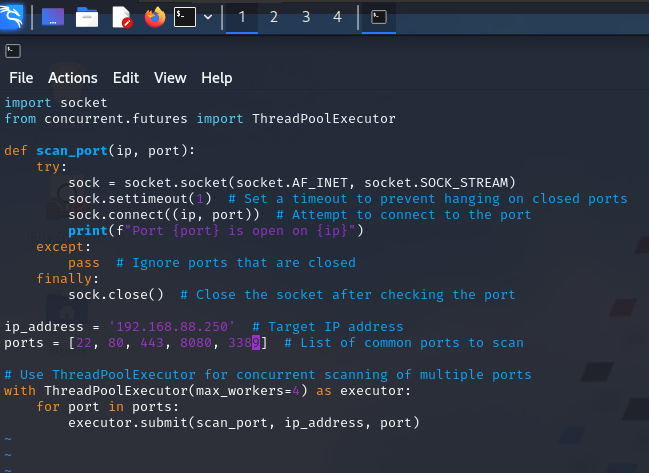
Here’s a simple Python script that scans specific ports on a target IP address and reports which ones are open.
					import socket
from concurrent.futures import ThreadPoolExecutor

def scan_port(ip, port):
    try:
        sock = socket.socket(socket.AF_INET, socket.SOCK_STREAM)
        sock.settimeout(1)  # Set a timeout to prevent hanging on closed ports
        sock.connect((ip, port))  # Attempt to connect to the port
        print(f"Port {port} is open on {ip}")
    except:
        pass  # Ignore ports that are closed
    finally:
        sock.close()  # Close the socket after checking the port

ip_address = '192.168.1.1'  # Target IP address
ports = [22, 80, 443, 8080]  # List of common ports to scan

# Use ThreadPoolExecutor for concurrent scanning of multiple ports
with ThreadPoolExecutor(max_workers=4) as executor:
    for port in ports:
        executor.submit(scan_port, ip_address, port)
Explanation:
- The script starts by importing the
socketmodule, which provides low-level networking functionality, andThreadPoolExecutorfromconcurrent.futuresto handle multi-threading. - The
scan_port()function attempts to establish a connection to a specific port on the target IP using a TCP socket. If successful, it reports the port as open; otherwise, it ignores it. Thesettimeout(1)ensures that the script doesn’t hang on closed or unresponsive ports. - The
ThreadPoolExecutoris used to scan multiple ports concurrently, improving efficiency compared to sequential scanning. The script specifies a maximum of four worker threads to handle the scanning.
This simple Python script demonstrates how easy it is to customize network scanning tasks using Python’s built-in tools. It can be extended further to scan a wider range of ports, add banner grabbing for service identification, or handle multiple IP addresses simultaneously.
Example:
					┌──(kali㉿kali)-[~/Documents/<REDACTED>]
└─$ vi portscanner_SN.py

┌──(kali㉿kali)-[~/Documents/<REDACTED>]
└─$ chmod +x portscanner_SN.py
					┌──(kali㉿kali)-[~/Documents/<REDACTED>]
└─$ python3 portscanner_SN.py
Port 3389 is open on 192.168.88.250
Reference:
For those interested in more advanced Python-based port scanning, ThePythonCode site provides a detailed tutorial on building a more robust scanner with features such as multithreading and error handling. This can be a great resource for readers looking to expand on this example.
Books:
- Black Hat Python: Python Programming for Hackers and Pentesters – Justin Seitz and Tim Arnold
- Python for Cybersecurity: Using Python for Cyber Offense and Defense 1st Edition – Howard E. Poston III
2. Bash for IP and Port Scanning
Bash, the default shell for many Linux and Unix systems, offers a lightweight and efficient option for performing network tasks such as port scanning. With simple built-in tools and commands like netcat (nc) and /dev/tcp, Bash allows users to quickly scan for open ports without the need for installing additional software. While not as feature-rich as NMAP, Bash scripts are useful for rapid scans and custom tasks, making them a handy tool for administrators and security professionals alike. Bash’s simplicity, combined with its ability to be run on almost any Unix-based system, makes it a convenient alternative for basic scanning operations.
Code Example:
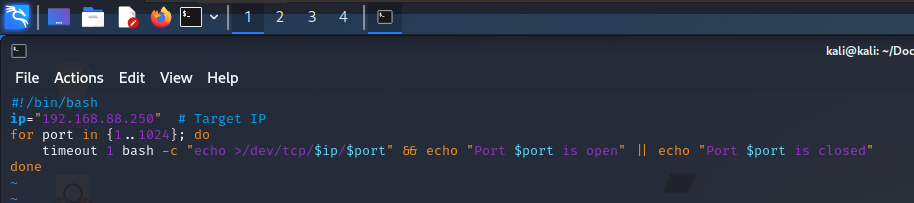
Here’s a simple Bash script that scans the first 1024 ports on a specified IP address using the /dev/tcp mechanism to establish TCP connections.
					#!/bin/bash
ip="192.168.1.1"  # Target IP
for port in {1..1024}; do
    timeout 1 bash -c "echo >/dev/tcp/$ip/$port" && echo "Port $port is open" || echo "Port $port is closed"
done
Explanation:
/dev/tcp: The script makes use of Bash’s special file system path/dev/tcp/, which enables TCP connections. This allows the shell to open a connection to a remote host on a given IP and port without requiring external utilities.- Port Scanning Loop: The script loops through the first 1024 ports (
{1..1024}), attempting to establish a TCP connection to each port on the specified IP address (ip="192.168.1.1"). If the connection is successful, the port is deemed open. timeout: Thetimeoutcommand is used to prevent the script from hanging on closed or unresponsive ports by limiting each connection attempt to 1 second. If no response is received within the timeout period, the script assumes the port is closed and moves on.- Output: If the connection is successful, the script outputs “Port X is open.” Otherwise, it prints “Port X is closed.”
While this script offers a simple and effective way to scan ports, it lacks some advanced features like parallelism or service detection. Nonetheless, it’s an excellent lightweight option for quick scans.
Example:
					┌──(kali㉿kali)-[~/Documents/<REDACTED>]
└─$ vi portscanner_SN.sh

┌──(kali㉿kali)-[~/Documents/<REDACTED>]
└─$ chmod +x portscanner_SN.sh
					┌──(kali㉿kali)-[~/Documents/<REDACTED>]
└─$ ./portscanner_SN.sh 2>/dev/null | grep open
Port 53 is open
Port 88 is open
Port 135 is open
Port 139 is open
Port 389 is open
Port 445 is open
Port 464 is open
Port 593 is open
Port 636 is open
Reference:
For more complex port scanning tasks, the Bash-Port-Scanner project on GitHub provides an enhanced Bash solution with additional functionality. This project is a great starting point for those interested in building more advanced scanning scripts using Bash.
Book:
- Black Hat Bash: Creative Scripting for Hackers and Pentesters – Nick Aleks and Dolev Farhi
3. PowerShell for IP and Port Scanning
Overview:
PowerShell, primarily used in Windows environments, offers robust network scanning capabilities through its built-in cmdlets and scripting flexibility. Unlike Python or Bash, PowerShell is designed for system administration and automation, making it particularly useful for network and system management tasks, including port scanning. With cmdlets like Test-NetConnection, PowerShell allows administrators and security professionals to quickly assess the status of ports and connections, often without the need for external tools. Its object-oriented nature and integration with the Windows operating system make it a powerful option for performing network scans and automating repetitive tasks.
Code Example:
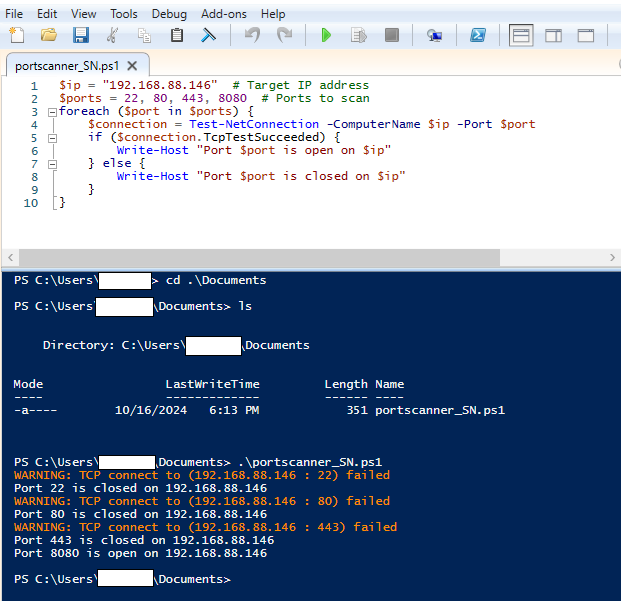
Below is a simple PowerShell script that checks the status of specific ports on a given IP address.
					$ip = "192.168.1.1"  # Target IP address
$ports = 22, 80, 443, 8080  # Ports to scan
foreach ($port in $ports) {
    $connection = Test-NetConnection -ComputerName $ip -Port $port
    if ($connection.TcpTestSucceeded) {
        Write-Host "Port $port is open on $ip"
    } else {
        Write-Host "Port $port is closed on $ip"
    }
}
Explanation:
Test-NetConnection: This built-in PowerShell cmdlet tests the connectivity of a specific IP address and port. It returns detailed results, including whether the TCP connection succeeded (TcpTestSucceeded), which is used to determine if the port is open or closed.- Script Logic: The script loops through the list of ports specified in
$portsand runsTest-NetConnectionfor each port on the target IP address. Based on the result, it prints whether the port is open or closed. - Object-Oriented PowerShell: PowerShell’s object-oriented output makes it easy to work with and manipulate the results of network scans. Instead of handling raw text, as with Bash, PowerShell outputs objects that can be further filtered, sorted, or manipulated programmatically.
This basic script can be extended with additional functionality, such as scanning wider port ranges, logging results to a file, or performing scans on multiple IP addresses. PowerShell’s rich set of cmdlets provides the flexibility to automate these tasks efficiently within Windows environments.
Example:
					PS C:\Users\InsiderThreat\Documents> ls
    Directory: C:\Users\InsiderThreat\Documents
Mode                 LastWriteTime         Length Name
----                 -------------         ------ ----
-a----        10/16/2024   6:13 PM            351 portscanner_SN.ps1
Reference:
For more advanced use cases, the SANS Pen Test Poster provides a comprehensive overview of PowerShell’s port scanning features, including more complex scripts and techniques for penetration testing and network analysis.
Book:
- Learn PowerShell Scripting in a Month of Lunches, Second Edition: Write and organize scripts and tools 2nd Edition – James Petty, Don Jones, Jeffery Hicks
Each scripting language—Python, Bash, and PowerShell—offers unique advantages when it comes to network scanning, particularly in situations where NMAP may not be available, required, or suitable for the task at hand. Python’s flexibility, with its powerful libraries and multi-threading capabilities, makes it an excellent choice for more complex, customizable scans. Bash provides a lightweight and efficient option for quick scans, especially in Unix-based environments, while PowerShell integrates seamlessly with Windows systems, offering powerful cmdlets and object-oriented output for network analysis.
These scripting alternatives allow security professionals to tailor their scans to specific needs, whether for a lightweight assessment or highly specialized tasks. By exploring the options these languages provide, users can develop their own custom scanning tools, offering greater control and flexibility over traditional, out-of-the-box solutions.
I encourage readers to dive deeper into these scripting languages, experiment with the code examples provided, and build upon them to create robust network scanning tools suited to their environments and needs.
References
- SANS Blog: PowerShell Built-In Port Scanner – Site
- Learn PowerShell Scripting in a Month of Lunches, Second Edition: Write and organize scripts and tools 2nd Edition – James Petty, Don Jones, Jeffery Hicks
- Bash Port Scanner on GitHub – Site
- Black Hat Bash: Creative Scripting for Hackers and Pentesters – Nick Aleks and Dolev Farhi
- ThePythonCode: Python Port Scanner – Site
- Black Hat Python: Python Programming for Hackers and Pentesters – Justin Seitz and Tim Arnold
- Python for Cybersecurity: Using Python for Cyber Offense and Defense 1st Edition – Howard E. Poston III
Network Scanning Cheat Sheet: Python, Bash, PowerShell
This quick reference provides key commands and one-liner equivalents for IP and port scanning using Python, Bash, and PowerShell.
1. Python IP and Port Scanning
					import socket
from concurrent.futures import ThreadPoolExecutor

def scan_port(ip, port):
    try:
        sock = socket.socket(socket.AF_INET, socket.SOCK_STREAM)
        sock.settimeout(1)
        sock.connect((ip, port))
        print(f"Port {port} is open on {ip}")
    except:
        pass
    finally:
        sock.close()

ip_address = '192.168.1.1'
ports = [22, 80, 443, 8080]

with ThreadPoolExecutor(max_workers=4) as executor:
    for port in ports:
        executor.submit(scan_port, ip_address, port)
Python One-liner:
python -c "import socket; ip='192.168.1.1'; ports=[22,80,443,8080]; [socket.create_connection((ip,port),timeout=1) and print(f'Port {port} open') or socket.close() for port in ports]"
2. Bash IP and Port Scanning
					#!/bin/bash
ip="192.168.1.1"
for port in {1..1024}; do
    timeout 1 bash -c "echo >/dev/tcp/$ip/$port" && echo "Port $port is open" || echo "Port $port is closed"
done
Bash One-liner:
ip="192.168.1.1"; for port in {1..1024}; do timeout 1 bash -c "echo >/dev/tcp/$ip/$port" && echo "Port $port is open" || echo "Port $port is closed"; done
3. PowerShell IP and Port Scanning
					$ip = "192.168.1.1"
$ports = 22, 80, 443, 8080
foreach ($port in $ports) {
    $connection = Test-NetConnection -ComputerName $ip -Port $port
    if ($connection.TcpTestSucceeded) {
        Write-Host "Port $port is open on $ip"
    } else {
        Write-Host "Port $port is closed on $ip"
    }
}
Powershell One-liner:
$ip="192.168.1.1"; $ports=22,80,443,8080; $ports | ForEach-Object {if ((Test-NetConnection -ComputerName $ip -Port $_).TcpTestSucceeded) {Write-Host "Port $_ is open"} else {Write-Host "Port $_ is closed"}}
Key Points:
- Python: Utilize the
socketlibrary for creating TCP connections andThreadPoolExecutorfor concurrency. - Bash: Leverage
/dev/tcpfor TCP connections andtimeoutto prevent hanging on closed ports. - PowerShell: Use
Test-NetConnectionto test connectivity to specific ports on a remote host.